
WELCOME!
Thank you for stopping by! My name is Crowbird, and I wanted to create a place for those to consult when it comes to CSS, as well as a location to store what I create. Feel free to use these codes and edit them however you wish. My only ask is that you replace the images you find used in my custom codes, as I have created them myself (the images will be watermarked once you copy-paste them). I will try my best to organize the code to be as user-friendly as possible, but please understand that many of these elements (such as images) require some fiddling with to fit your profile. If you’re having difficulties with something, copy-paste your code into ChatGPT with your specific question (it’s saved me too many times to count!), or reach out to either me or fellow creators in the Janitor.AI creator server. You can also find me in the Night Drive Discord server as well, where I am very active! My personal Discord account is @crowbirdie (messages are welcomed, though any empty friend requests will not be accepted). With that being said, happy coding, and I hope you enjoy! <3
NOTE: due to Janitor.AI’s many updates, classes are prone to changing or “breaking.” So.. if a code here doesn’t work, check the class on your end! I’ll try my hardest to keep on top of these updates, but ah.. I am only human. Also, this page is best viewed on desktop!

3/26/2026 notice: I have created a new Neocities page for all my custom layouts!
CLICK HERE TO SEE MY CUSTOM CSS

beginner's guide to css!
Hello! Oh, I'm so glad you could make it!
I've been where you may be right now: confused, intimidated, and unsure of where to begin when it comes to CSS. I'll make it my personal goal to alleviate some of your trepidation, and get you set on a path where you not only feel comfortable working with CSS, but confident, too!
So... where do we begin?
i. finding css classes
What are CSS classes? They are what define what you’re working with. You will oftentimes see them as a mix of numbers and letters, or text, with a period before them. In order to adjust something, you need to include the class.
Class example: “.css-18bnokj"
Um... how do we find these classes?
Easy! On desktop, left click and select “inspect” or “Ctrl+Shift+C” to bring up the inspect element page. From there, we continue as such (numbers match the photo included):
1. Click the select element button (bottom left). Make sure you have “</> Elements” selected!
2. Then click your desired element.
3. Then locate the class details to the bottom right.
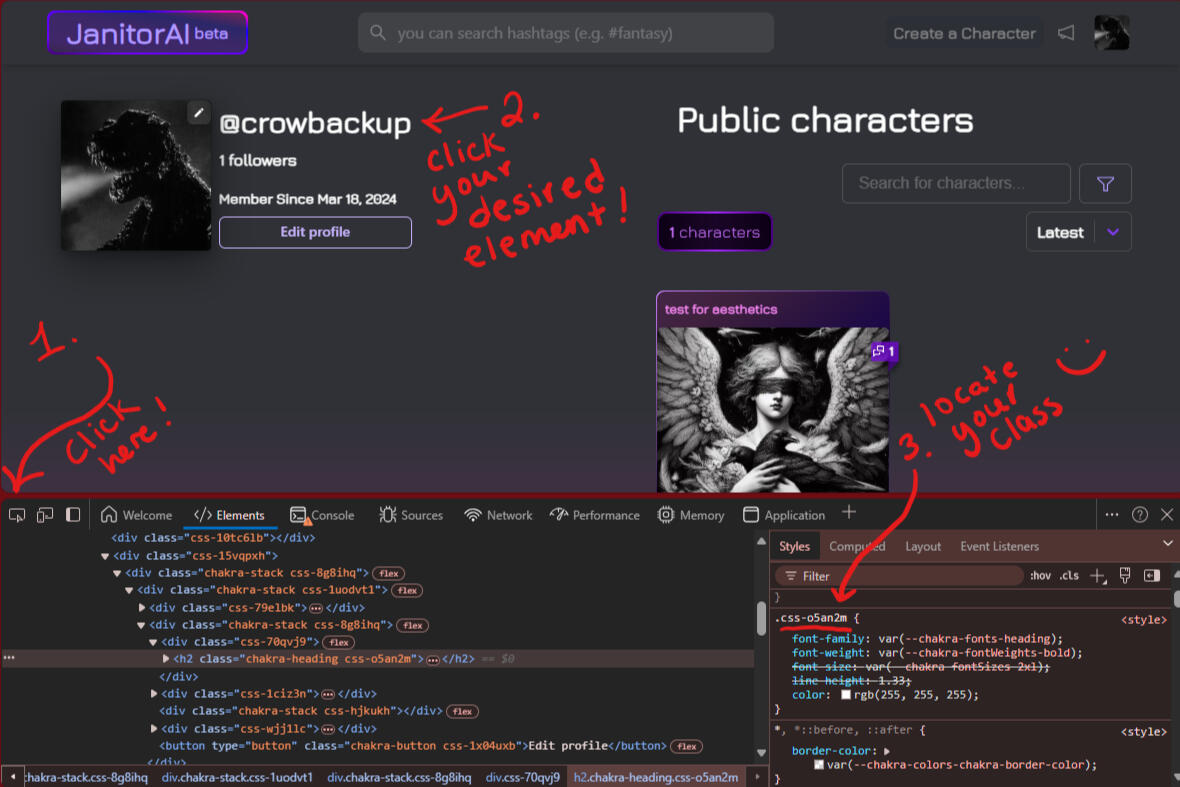
This is an incredibly important skill to have, as you will be using this to find your custom class codes (class codes that are unique to every individual).
Fun fact! See that menu in the bottom right hand corner where the class is located? You can test your adjustments there to see what they look like, and you can just copy paste! For example… Let’s say I want my username to be the color red, be in the font “Times New Roman,” make it bold, and.. oh, let’s give it a cool glow effect!
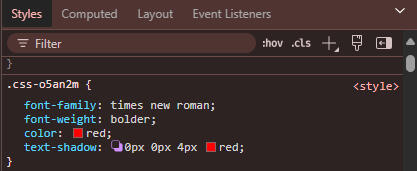
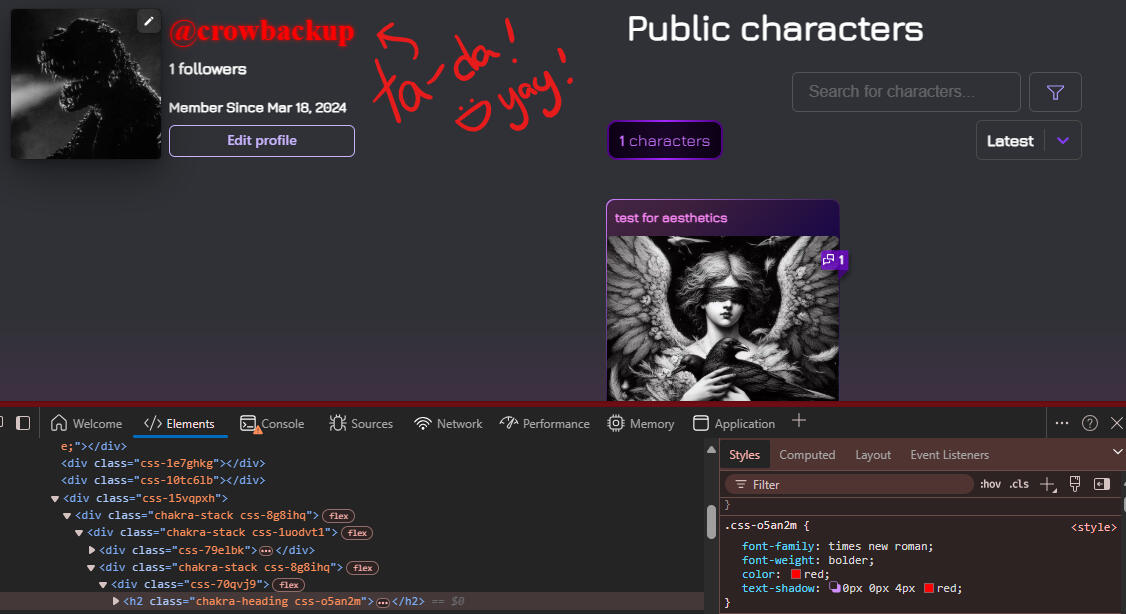
Pretty cool, huh? And convenient, because you can now actually just copy that code you adjusted, and paste it directly into your CSS editor!
.css-o5an2m {
font-family: times new roman;
font-weight: bolder;
color: red;
Text-shadow: 0px 0px 4px red;
}
All right, I got this code copied. Awesome! But... where do I paste it?
ii. where do i put my code?
Before the handy dandy CSS update some time ago, we used to have to adjust our code in the settings section (you’ll often see this show up in older guides and videos). But now, we can locate it on our profile page. Remember to save!
Below is a gif showing the location of the alternative CSS editor found in settings. Some prefer this over the current CSS editor!! This is due to the fact that the present editor can be buggy (partial deletion of code, removal of text enclosed /*in this style */, etc).
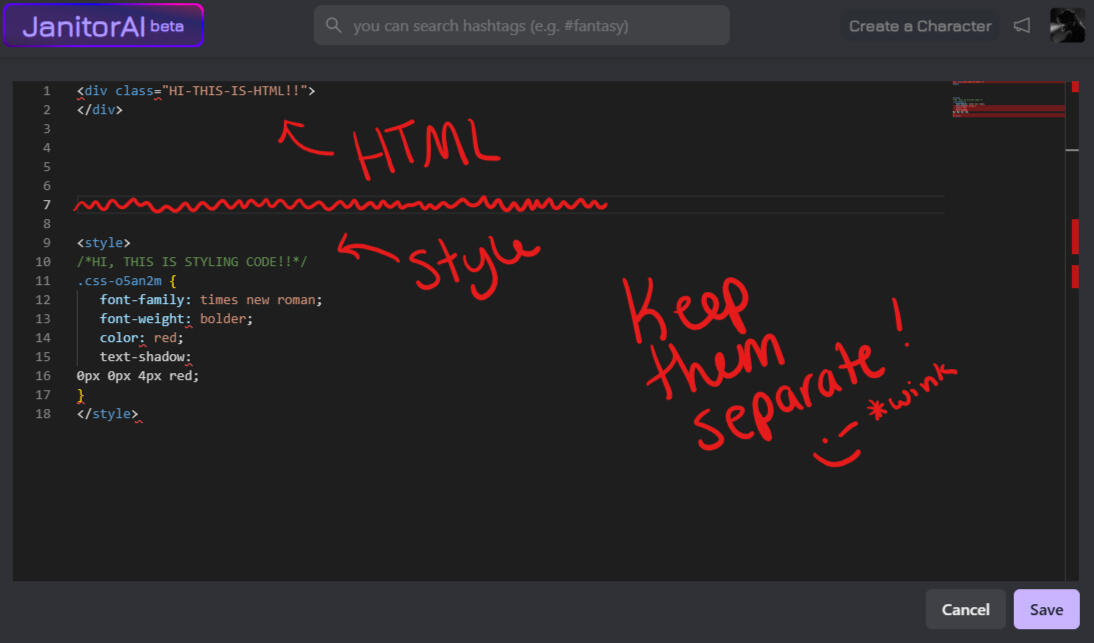
See how I put “<style></style>” around my code?
That’s how you get those codes to work! For all your styling codes (codes that have .classhere in it), they NEED to be enclosed in the <style> and </style>.
NOTE: ALL YOUR HTML CODES MUST GO BEFORE YOUR STYLE CODES. They cannot be intermixed! You’ll see what HTML codes are below and when we get into my custom codes. For the most part.. They’re not necessary; just a fun new thing once you feel confident enough to get into further customizing your profile card!

iii. position matters!
As I just mentioned in my above note, the position of your codes in your CSS matters. I cannot stress the importance of this enough.
What's the correct way to organize your code?
Firstly, HTML will always go above your <style></style> coding. Always. If you intermix the two, your code won’t work. HTML codes are those that are enclosed by <div></div>, and are utilized in more complex creations. As I mentioned earlier, HTML is not necessary for the most basic profile customization experience, thus I will not be going into deep detail here. But for those who are curious: HTML codes are essentially akin to containers that can be utilized to create and hold things such as images, animated elements (many of which are presently disabled on janitor), tables, drop-downs, text boxes, etcetera. You can find a list of these in the "commonly used codes" section of this website.
Secondly, though this rule isn’t as strict, try to arrange your style codes in the way your profile’s css is naturally laid out. What I mean by this is, in inspect element, you can see how your codes go: top to bottom. It doesn’t need to be exact in my experience, but if something isn’t working, try rearranging it. For example, you don’t want your bot card adjustment codes to go above your profile picture code.
iv. tips for avoiding the loss of your code
Due to the beta state of janitor, there are bugs to be found when working with CSS on the native site. Countless times have I seen people lament the loss of hours of their coding.. and I've been one of those people, too.
It sucks.. but it can be avoided!
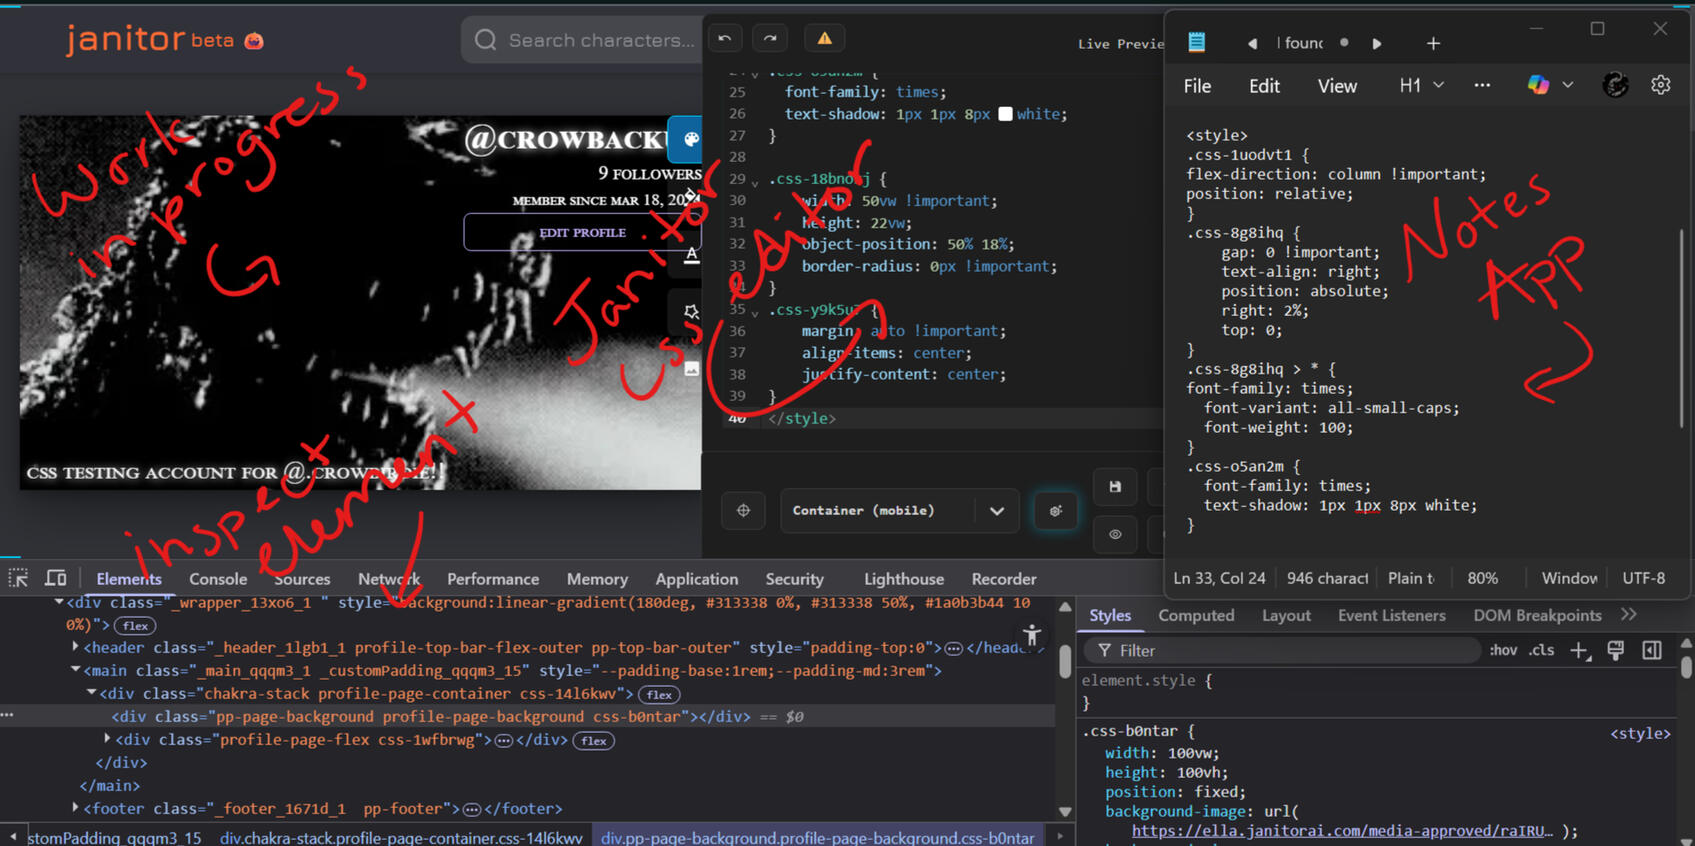
How..? Well, there are numerous applications that can be used, but they all serve the same purpose: to hold your code for safekeeping whilst you work. I make it a habit to work in the said application, such as Word or your computer's native note app (which is what I personally use), then copy paste into the Janitor CSS editor.
For example, here's what my screen looks like when I edit:
v. f.a.q.
Here's a couple of questions I receive often, and hopefully they may be of assistance to you!!
"Whevever I refresh, certain aspects of my code are lost/don't stay!"
Man, do I hate this when this happens.. 9 times out of 10, this happens because you're attempting to use a code/element that is presently disabled on Janitor. This results in the specific code/element being removed when you try to refresh your page. Here is the current list of disabled elements:
CREDIT TO PUPPY (@.permanent):
| <input type="button"> | <input type="checkbox"> | <input type="color"> |
| <input type="date"> | <input type="datetime-local"> | <input type="email"> |
| <input type="file"> | <input type="hidden"> | <input type="image"> |
| <input type="month"> | <input type="number"> | <input type="password"> |
| <input type="radio"> | <input type="range"> | <input type="reset"> |
| <input type="search"> | <input type="submit"> | <input type="tel"> |
| <input type="text"> | <input type="time"> | <input type="url"> |
| <input type="week"> | <svg> | <button> |
| <label> | <video src> | <audio> |
| <path> | <script> | <textpath> |
| URL() | scrollbar-width | scrollbar-color |
| scrollbar-gutter | overflow-clip-margin | scroll-behaviour |
| scroll-margin | scroll-padding | scroll-snap-align |
| scroll-snap-stop | scroll-snap-type | details name attribute |
| @container | mask-composite | variables |
| attr(data-text) |
"My code just isn't working, even though I know it should be!"
So.. this can be a result of many things (e.g., incorrect elements, positioning, etc.) - but it is often a super small mistake that's easy to look over. For example, there could be a misspelling, missing syntax, or extra spacing (this last one has gotten me SO many times). Happens to the best of us! Whenever my code isn't working and I just don't know why, I copy paste my code and send it to ChatGPT, or ask for help (many creator Discord servers have CSS help channels). ChatGPT is a phenomenal tool when it comes to coding. It can even help you create a code you don't know how to do, explain things for you, or walk you step through step on things! It's something I wish I had earlier access to in my coding endeavors.
"I want to code, but I don't have any ideas on what I want to do. What should I do?"
Intriguingly, I get this question a lot. I am very fortunate and privileged to say that a lot of my creativity and inspiration comes naturally to me (due to how many years I have also been making graphics), though I do totally understand when you hit a creative roadblock, so to say. We're only human, after all! So.. what helps? Where can you find inspiration? Before I offer suggestions and resources, one thing is INCREDIBLY important to follow:
REMEMBER TO TAKE INSPIRATION RESPONSIBLY.
This means to apply credit, heed the comments of the creator (such as if they don't want their idea to be reused), and be respectful. Please. It's not difficult. :)
Okay! With that being said, here's a list of sources for creativity:1. other creator profiles.
↳ feel free to take a look at cool profiles that inspire you! Maybe you'll get a new idea just by admiring their work or see how they coded something ala inspect element. But again.. DO NOT TAKE ELEMENTS without credit or consulting the original creator first! If you do not heed this, it is punishable (Janitor has rules in place to enforce this). Be kind, be respectful - act towards others' work in the manner you would want others acting toward your own, unique ideas.2. pinterest.
↳ this is a great tool for finding inspiration of all different kinds of things! Here are some keywords you can look up: "CSS inspiration", "CSS layouts", "character graphics", etc.3. deviantart.
↳ so here's a resource I don't see a lot of people using when it comes to finding inspiration, which is a shame, since there's so many great things to be found on this website!! I'll make this easy by providing a link to a deviantart search for "photoshop character psds." They are character graphics intended for Photoshop, but their layouts can be taken as inspiration for CSS. Some may even be purchased, and you can credit them in their comments!! Click here.
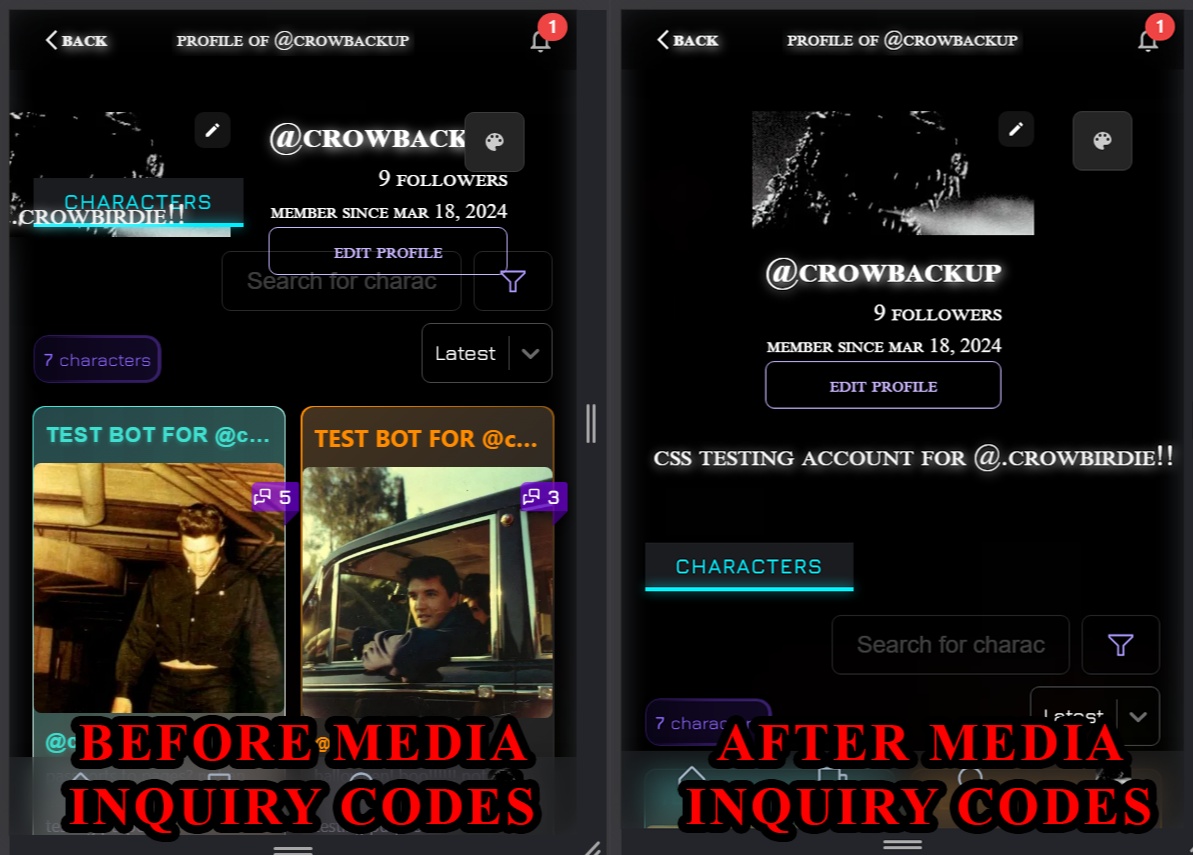
"Why does my code look so different on mobile compared to desktop? Can I fix this?"
Ahhhhh, the dreaded Media Inquiry. To answer simply, yes! There is hope!! Let me walk you through an easy way to kick off your adjustments.First, go into your inspect element view. From here, there is a button that you can use to change to mobile view! There, you can begin to make your adjustments. I have a more complicated layout to illustrate how rough a desktop layout can look at first on mobile:
So, with the adjustments copied, I add @media (max-width: 768px) { before the chosen class with an extra } at the end! Doing this would make the class look something like this..
@media (max-width: 768px) {
.class-here {
adjustments here: x;
}
}
This here, the: @media (max-width: 768px) is what is called Media Inquiry - simply put, it's a command that ONLY applies to mobile! Meaning, using that command, it'll adjust the class on mobile, but not on desktop. Sooooo.. if I apply my copied class and its adjustments as seen in the gif above... this is what it would look like:
@media (max-width: 768px) {
.css-8g8ihq {
gap: 0 !important;
text-align: right;
position: relative;
top: 0;
}
}
When I apply this as I do other codes (between <style></style>), the result in the gif above will be shown on mobile. This can be done to as many classes as you'd like! If you want to include multiple, I suggest aligning it as such so you don't have to copy paste @media a bunch:
<style>
@media (max-width: 768px) {
.css-8g8ihq {
gap: 0 !important;
text-align: right;
position: relative;
top: 0;
}
.class {
font-size: 17px !important;
}
.text-box {
margin-top: 0 !important;
margin-left: 0 !important;
}
}
</style>
If you go this route, just make sure to have an extra brace "}" at the end! This'll enclose all your classes in the @media !!
And that's it for the beginner's guide!
I hope that this was able to provide you with a good starting point to understanding the basics of CSS. To those who are looking for more in depth explanations or other resources, check out the guides below:
vi. other guides
I wouldn’t be where I am today in terms of CSS without the assistance of some wonderful people who went out of their way to provide help just like this guide. In fact, it’s them who inspired me to even begin this!!! So please, I implore you to also look at their guides and resources. Especially Luna’s, as she goes super into detail for pretty much all of the elements and code classes.
PUPPY’S CSS BREAKDOWN AND ELEMENT LISTLUNAXLEE’S GUIDEOISHIIDESU’S GUIDERYUUNIA_'S GUIDEJANITOR.AI CREATOR DISCORD
Specifically, check out the “profile customization” section under the “creator corner” in the janitor.ai creator discord
vii. closing notes
If you've gotten this far, I want to thank you for being present. But more than that...
I have one last thing I'd like to say:

be kind to yourself!
I can assure you that every person you meet on Janitor.AI who is at least somewhat confident with CSS, began at a point where they felt lost, confused, and frustrated over it. I, myself, had to stumble quite a lot; I still have my moments on occasion! I’m sure you’ve heard this sentiment before, that all it takes is practice… but it’s no less accurate. CSS is akin to trials by fire, so expect personal adjustment, and the occasional trip and fall. It’s okay! That’s what others are here for, so don’t be afraid to reach out if you’re having trouble! You got this. I believe in you!
Psst.. interested in more..? Continue scrolling for the "commonly used codes" section or my custom codes next!

COMMONLY USED CODES!
Hey there! Feeling more cofident with CSS..? Awesome.
As the title of this section implies, you'll find a list and database of codes I frequently use. Feel free to reference it at your leisure!
HTML
IMAGE:
<img src="IMAGE URL HERE" style=”width:100%;”>
TURNING AN IMAGE INTO A LINK:
<a href="LINK HERE">
<img src="IMAGE URL HERE">
</a>
ACCORDION DROP-DOWN:
<details style="list-style: none;">
<summary> Header Text </summary>
the text here will be inside the drop down. You can also add aditional <div>'s here, too!
</details>
ACCORDION DROP-DOWN (using an image instead of text):
<details style="list-style: none;">
<summary> <img src="IMAGE URL HERE"> </summary>
</details>
HEADER:
<h3 style="font-size: 100%; text-align: center;">HEADER TEXT HERE</h3>
TABLE:
<p class="list">
Name <br>
Name <br>
</p>additional style code:
.list {
column-count: 2;
width: 49%;
}
STYLE CODES
TEXT ADJUSTMENTS:
font-variant: all-small-caps;
text-shadow: 1px 1px 5px white;font-style: italic;
text-transform: uppercase;font-family: Times New Roman
font-weight: bold; OR :400px;
HIDING CONTENT:
display: none;
FLEX (when you want images next to one another in a container):
display: flex;
CENTERING (not all three at once are necessary):
margin: auto;
justify-content: center;
align-items: center;
SCROLL (for turning a text box into a scroll):
height: 200px; /* you must define a height for this to work */
overflow-y: auto;
DARK GRADIENT (ex: over an image):
mask-image: linear-gradient(#000000, #0000000f) !important;
GRADIENT BORDER (for containers):
background:
radial-gradient(circle, rgba(191,154,48,1) 0%, rgba(246,226,129,1) 50%, rgba(191,154,48,1) 100%) 0 0 / 100% 2px,
radial-gradient(circle, rgba(191,154,48,1) 0%, rgba(246,226,129,1) 50%, rgba(191,154,48,1) 100%) 0 100% / 100% 2px;background-repeat: no-repeat;
STYLE CLASS ADJUSTMENTS
HOVER ANIMATIONS
ADD THIS TO THE ORIGINAL CLASS FOR SMOOTH TRANSITIONS (otherwise it'll jump):
transition: all 0.5s ease; /* adjust the 0.5s for speed of transitions */
INCREASE SIZE:
transform: scale(1.2); /* adjust 1.2 number as desired */
HOVER BOT IMAGE SATURATION:
.css-1q7rmf0 {
transform: none !important;
filter: saturate(0);
-webkit-filter: saturate(0);
transition: all 1s ease;
}
.css-1q7rmf0:hover {
filter: saturate(1);
-webkit-filter: saturate(1);
}
GLOW AROUND (class used below is for the whole bot card):
.css-1s5evre {
background: black;
transition: all 0.65s ease !important;
}
.css-1s5evre:hover {
box-shadow: 0px 0px 10px 2px rgb(255 255 255 / 67%);
}
MOVE POSITION:
transform: translate(50px, 100px); /* 50 pixels to the right, and 100 pixels down */
ROTATE:
transform: rotate(20deg); /* 20deg is counterclockwise */

created by crowbirdie on janitor.ai